How to Fix GPU Artifacting? – Causes and Possible Solutions
Looking for a solution how to fix GPU artifacting? Here, in this article I have explained what GPU artifacts are, what causes them, and how to fix them.
Graphics Processing Units (GPUs) are responsible for smoothly rendering images and videos and performing intensive activities like games that require a lot of processing power. Therefore, the more complex tasks it performs, the more likely it is to make errors repeatedly.
An example of such a problem is GPU artifacting, which occurs when you’re playing games or performing other tasks. And this causes your screen to display several abnormal lines, dots, pixels, etc.
So, how does one fix it and make it go away permanently? For more information, read on.
What is GPU Artifacting?
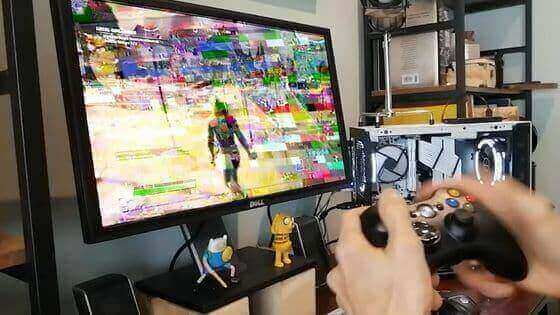
When the graphics processing card becomes unresponsive due to a glitch, we refer to this as GPU artifacting. Although your GPU will not display any Blue Screen of Death (BSOD) errors or crashes, but it will also not show the visual information as it would otherwise.
Depending on what’s going on with the GPU, your display can show everything from a few dots to a few lines to a lot of color mismatch or flashing. As a result, you’ll usually see some mishaps with the screen or its colors.
It is possible to encounter artifacts even when the GPU is unused. This could be caused by the monitor ghosting, but it often happens when the GPU is in use.
While artifacts are sometimes indistinguishable and do not necessarily alter gameplay, a problem may arise due to them.
In most cases, it is due to GPU overclocking and rising temperatures causing overheating and resulting in artifacts. However, other factors may contribute to GPU artifacting as well.
For example, watch this video:
GPU Artifacting Causes
In many cases, GPU artifacting can be caused by several factors, but overclocking and overheating are mostly to blame. For example, over-using a GPU may result in it experiencing glitches because of high temperatures.
Apart from this, excessive programs running at once, obsolete drivers, and faulty hardware are all common causes. Let’s examine these in detail to understand the exact GPU artifacting causes.
1. Overheating
Overheating is the prime cause of GPU Artifacts. In the event of overheating, the GPU can cause distortion or glitches in the graphics.
Several factors can be responsible for this problem, including dust accumulation on the heat sink, insufficient cooling, or operating the GPU at too intense temperatures.
You should therefore clean your GPU every month; if it is old, you can do it in a fortnight. By doing this, air will flow properly from your GPU, and the heatsink will help keep it cool, making sure that it operates at a healthy temperature, which is crucial for both performance and hardware durability.
2. Overclocking
When you overclock your graphics card, you gradually raise its clock speed to enhance its performance. However, it comes at the price of overheating and straining your GPU.
Usually, gamers do this to upscale their performance when gaming, but if not done correctly, it can cause GPU artifacts. When you try to play the game, it starts normally, but the lines appear somewhere in the middle.
This is because when you overclock your graphics card, you overextend its capabilities, which may result in data corruption. Also, you may notice a slowdown in your GPU that prevents it from rendering visuals correctly.
3. Graphics Drivers
Here we have another cause, which is graphics drivers. The drivers are responsible for communicating with the hardware and software; if they are outdated or not updated, you may see GPU artifacts.
Generally, due to drivers’ faults, these errors appear as black or white dots, lines, or squares. To fix this issue, install the latest graphic card drivers.
For example, If you own an Nvidia Graphics Card, you can download drivers straight from Nvidia’s official website or use an app called Nvidia GeForce Experience.
4. PSU’s Problems
There is a possibility that the GPU artifacts may be caused by the power supply unit. If the PSU cannot give the GPU enough power, there is a big chance you will see a variety of problems. This can be from minor artifacts to complete crashes and can even cause damage to the hardware components.
So, make sure that you check the graphics card compatibility before buying a graphics card.
Also, it is advisable to use higher wattages power supplies if you are overclocking your GPU. Because when you overclock, it uses more electricity and generates more heat, so better cooling is required.
5. Problems With VRAM
Among the possible causes of artifacts, VRAM is one of the most difficult to resolve. In order for games to perform well, graphics cards need VRAM. Its purpose is to ensure the smooth and even display of graphics. Moreover, it is particularly relevant to applications with highly detailed textures or those that render polygon-based three-dimensional (3D) structures.
During the course of time, if part of it is damaged, it will corrupt the data, causing artifacts to appear. Generally, it won’t give you huge shapes or distorted images if the VRAM is the cause. In place of that, you will see tiny flickering dots or slight color changes on your screen.
For example, You may see thick gray or other colored lines in a game if you’re viewing a sky.
The most effective way to free up VRAM is to delete unwanted games, heavy programs and force running background programs to stop. Also, many games are not properly optimized, so avoid playing them at ultra-high settings.
6. Physical Damage to Graphics Card
Almost all personal computers depend on graphics cards, and a failing graphics card can make the PC inoperable. So, if it is damaged, your screen may display strange artifacts.
If the crucial parts inside the video card have been damaged or fried up due to excessive heat, the card will surely die over time.
In some cases, faulty manufacturing may cause components to fail prematurely. As a result, you can claim a warranty replacement for your card.
7. Game Updates
There is a big possibility that the game you’re playing on your PC is responsible for GPU artifacts. Sometimes, it happens that game updates are available, but we don’t update them very often. In that case, you should make sure to update the game. However, it only occurs in one or two titles out of many.
As a result, this cause is not very relevant, but it has an unlikely probability. Additionally, if the problem persists, consider uninstalling and reinstalling the game to ensure the files aren’t corrupted.
Can You Fix GPU Artifacting?
Fortunately, certain artifacts can be fixed, but if there are more severe problems, your graphics card will need to be replaced.
However, don’t jump to conclusions before trying the methods yourself. Continue reading, as, in the next section, I am sharing all the possible solutions you can try to fix GPU artifacts.
How to fix GPU artifacting?
To resolve the problem, you can try the following methods.
1. Do not overclock
As I mentioned earlier, gamers try to boost their GPU power by overclocking it, which causes GPU artifacts. So, the solution to fix it is that you have to undo the overclocking.
You can do this by deleting the application you used to overclock the computer and restarting the system. Furthermore, if you’ve overclocked your GPU too much and your card is too old, you may not even be able to run it at normal speed. That’s why you should consider underclocking your GPU as a last resort.
So, to underclock, you can use the famous program called MSI Afterburner. It’s relatively easy to underclock your GPU after opening MSI Afterburner.
2. Keep the GPU temperature low
As mentioned above, GPU artifacts are mostly caused by overheating, which may lead to graphics distortions.
As a result, you should keep an eye on the temperature when the device is being used. The easiest way to check the GPU temperature is by using the task manager on Windows. To do this, follow the steps below:
Step 1: Right-click on the Taskbar and choose Task Manager.

Step 2: On the Performance tab of Task Manager, you will now see “GPU Temperature.”
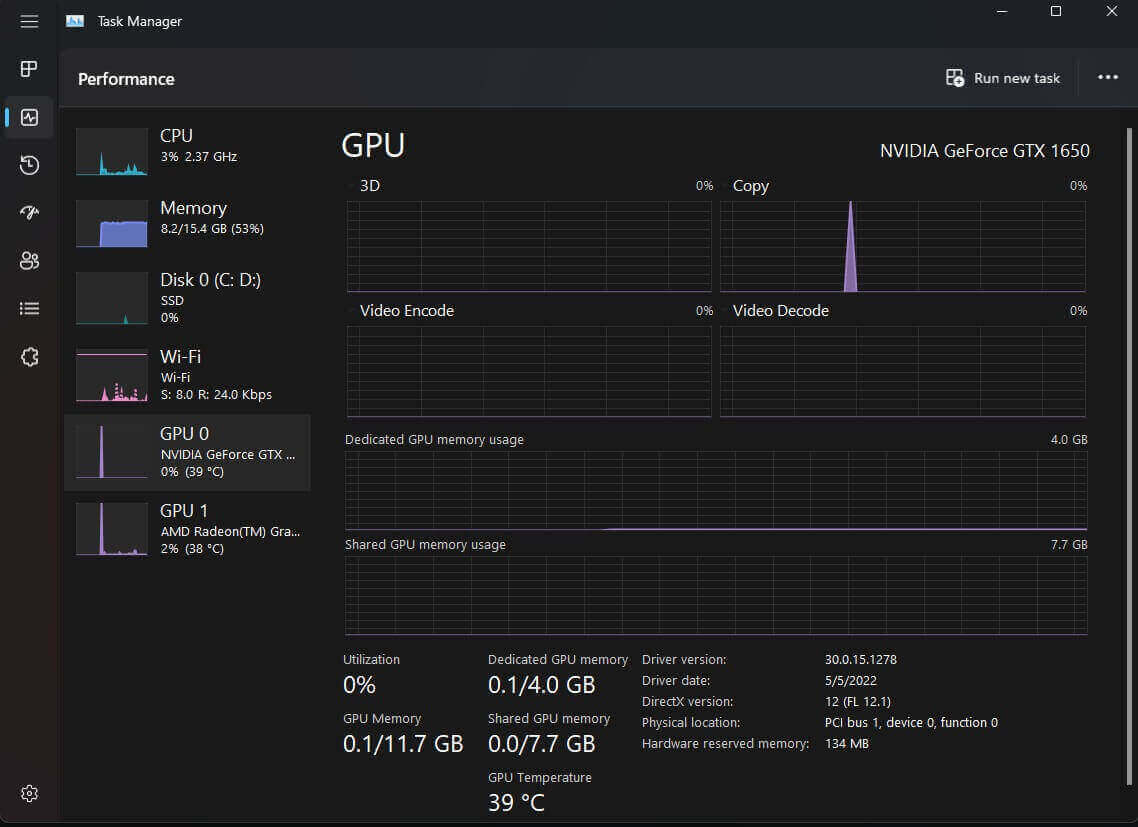
Note: Only dedicated GPUs work with this (not onboard or integrated GPUs). If you want to use it, you need a graphics driver that’s up to date with WDDM 2.4 or newer. Right now, temperatures are shown in degrees Celsius, not Fahrenheit.
Moreover, you can inspect the GPU by opening the CPU tower to ensure all fans are working properly. By doing this, your components will be able to cool down easily due to adequate airflow and easy heat dissipation.
3. Update the Graphic Drivers
It is not uncommon for the GPU driver provided by the manufacturer to have bugs and negatively impact the performance of your GPU. AMD graphics cards that have been installed with the driver for certain reasons have been reported to exhibit GPU artifacts.
Also, it’s imperative to keep your drivers updated, so your system is ready to handle all the graphics-intensive games you’ll launch in the future.
There are two methods to update drivers on your system: manually and through manufacturer’s software such as Nvidia GeForce Experience.
Software Method:
Follow the steps given below:
Step 1: Download and install the software on your system.
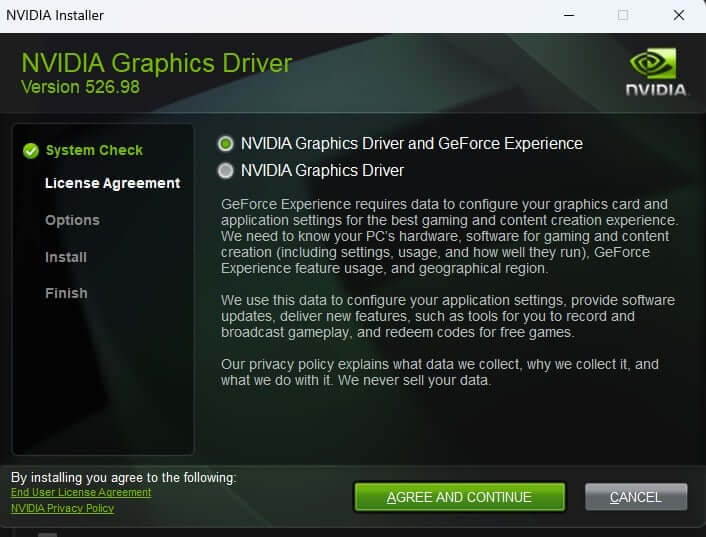
Step 2: Open the software and click on the Drivers tab.
Step 3: Now, it will automatically search for supported drivers for your hardware. You simply have to download the latest drivers and install them right away.
Manual Method:
The process of updating the graphic drivers can be completed by following the steps below.
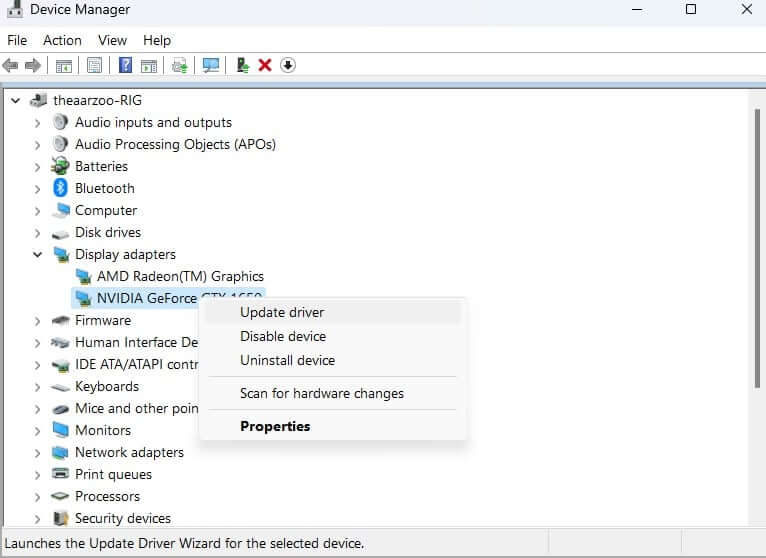
Step 1: To open Device Manager, press Windows + ‘X’ and & choose Device Manager from the options.

Step 2: Choose the GPU from the Display Adapters section.
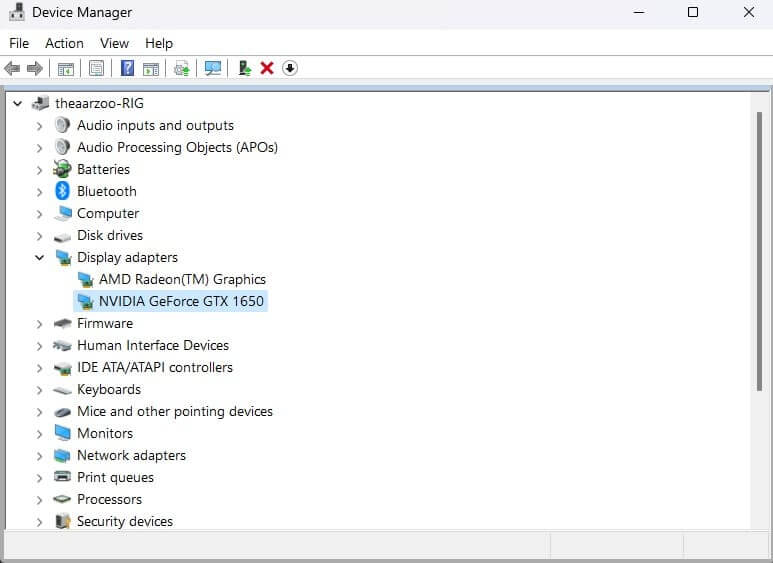
Note: I recommended updating the driver for both Integrated and Dedicated GPUs.
Step 3: Right-click on it and select ‘Update Driver.’
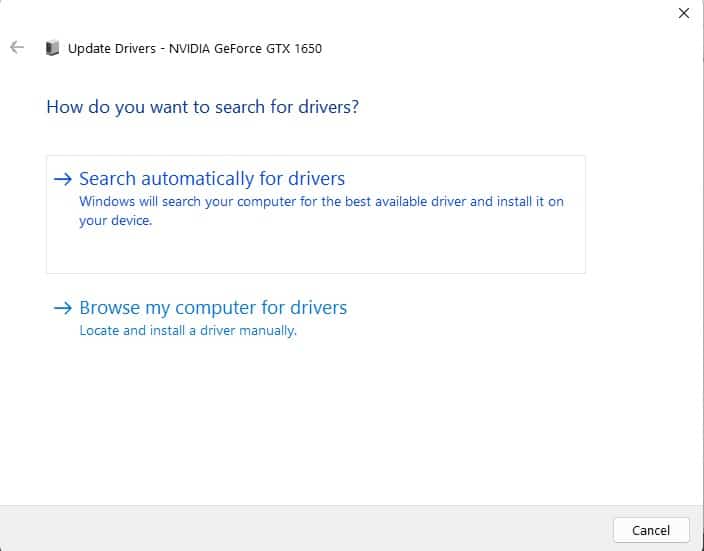
Step 4: Choose the option “Search automatically for drivers.”
Note: The manual method is not always accurate and may not recommend the latest drivers. So, update with the official software.
Hopefully, this will solve the GPU artifacting problem, but if it does not, you will have to try other methods.
4. Replace the thermal paste
It is possible that your GPU’s thermal paste needs to be replaced.
Generally, thermal paste lasts two to four years on CPUs, GPUs, and other chips. Depending on the type of cooling system, the weather, usage, and the quality of the compound, the thermal paste can last as short as two years or as long as ten years.
Thus, it is recommended to use the premium quality thermal paste to make the GPU and heatsink better at transferring heat and ensure that the product lasts as long as possible without going hard.
5. Run Programs in Compatibility Mode
A GPU that is too old is more likely to show artifacts due to the deterioration of its capacity caused by the long-term rendering of images.
Using Windows Compatibility Mode is a helpful way to solve problems, allowing software to run on an older version of Windows.
If you’re using high-end programs on your system, you should stop them as it will reduce the stress on your GPU. Instead, use compatibility mode to run the programs, which may help reduce the display of artifacts.
Here are the steps to follow:
Step 1: Choose the program you want to run by right-clicking it.
Step 2: Select Properties.
Step 3: Navigate to the Compatibility tab in the newly opened window.
Step 4: Run with 640×480 screen resolution and Reduced Color Mode checked.
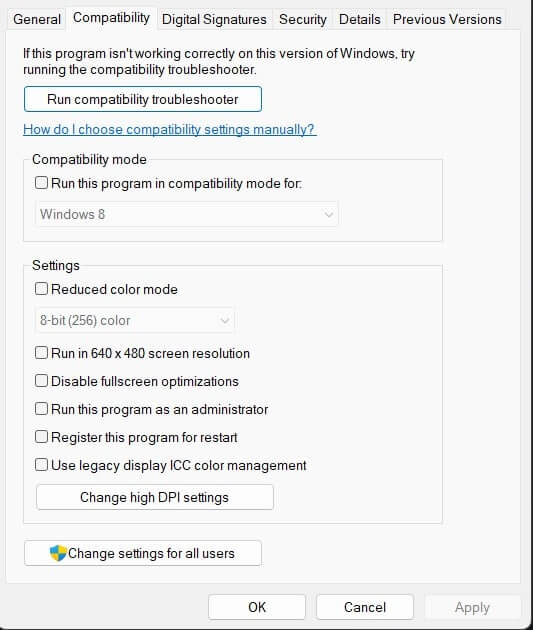
Step 5: Then click Apply and run the program.
Step 6: See and check if this fixes the artifacts problem by running your desired game.
Final Words
Even though GPU artifacts don’t directly affect gameplay, random lines and screen flashes can often interfere with enjoyment.
You can usually fix graphical glitches by not overworking your system and giving your GPU a rest, which is one of the best ways to do so. Besides this, I strongly recommend you go through the solutions I mentioned in the article to learn how to fix GPU artifacting.
PCs that are too old can suffer from GPU artifacts, and your last option, in that case, would be to replace the GPU.
