How to Take Out a Graphics Card – The Right Way
Looking for information on how to take out a graphics card from a PC? You’re in the right place.
If you are a gamer or a video editor, then a graphics card is the primary workforce of your computer. And you should expect to change or upgrade your graphic card after a while.
If you want to change your graphics card, you must first remove it from the motherboard. While it sounds challenging, anyone can do this with the help of proper guidelines and tools.
However, you may damage the motherboard if you don’t remove your graphics card properly. This can happen because the motherboard has slots for the CPU and the graphics card. If you accidentally push your graphics card into the wrong slot, it can stop your computer from working.
Your motherboard will also be damaged if you put too much pressure on it. So, following the standard procedure is crucial if you’re a first-timer.
This article will guide you step-by-step on how to remove graphics card from motherboard.
See: What does Ti mean in Graphics Card?
Why You Should Remove Your GPU?
Changing or removing a graphics card can be done for a variety of reasons. The decision to remove the GPU is completely up to you.
Reasons:
- In order to obtain more performance, you can upgrade your current GPU with one that is more powerful.
- If your graphics card is not working, you may want to remove it for troubleshooting.
- You might want to give your dusty graphics card a spring cleaning if it’s been collecting dust for a while. To do this, you can remove and clean your graphics card.
How to Remove a Graphics Card?
As I mentioned earlier, a graphic card is an integral part of your PC, connected to the motherboard. Due to the additional components of a computer, it can sometimes be complicated.
Below are the steps mentioned to remove the graphics card in detail.
Note: GPUs are among the most expensive devices. So don’t pull and yank at your graphics card as it can easily be damaged by a small mistake.
1. Check Whether It’s Integrated Or Dedicated
In order to proceed with the removal of the GPU, you must first confirm the type of graphics card on your computer.
Graphic cards are usually divided into two categories: integrated and dedicated.
The dedicated graphic cards are mounted with screws and locks, while the integrated graphics are directly inbuilt with the CPU.
There are many options available for identifying the dedicated graphics card.
Method 1: There is an expansion slot near the CPU where you can find it.
Method 2: Check your computer’s sticker for system specs to see if it shows your graphics card information.
Method 3: Alternatively, you can check it on the company’s website or on your PC.
Follow the steps to check the type of GPU:
Step 1: Navigate to the device manager.
Step 2: Locate the display adapter.
Step 3: Identify the graphic card number by its name. The presence of more than one device here indicates that a dedicated GPU chip is present.
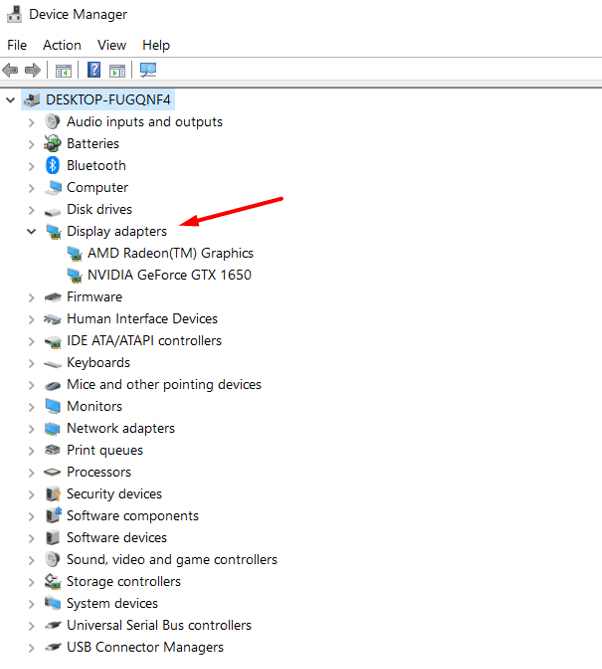
Step 4: Lastly, check the manufacturer’s website for more details.
2. Remove all the GPU software and drivers
Dedicated graphics cards on PCs can be removed, but some work needs to be done before the graphics card can be removed.
Because not only physically, graphic cards are also digitally connected to PCs through drivers.
A driver is a set of software files that enable physical devices to communicate with a computer’s operating system. Furthermore, without a driver, computer data cannot be received or transferred from physical devices.
And before removing the physical connection, you must ensure that the digital connection has been broken. The only way to do this is to remove all GPU-related drivers and software from your computer.
Note: Removing the GPU drivers is not required. However, removing them is recommended to avoid driver conflicts.
Let’s say you don’t know how to remove a graphics card driver. The following is a step-by-step guide.
Step 1: Open the Run command by pressing the Windows + R key.
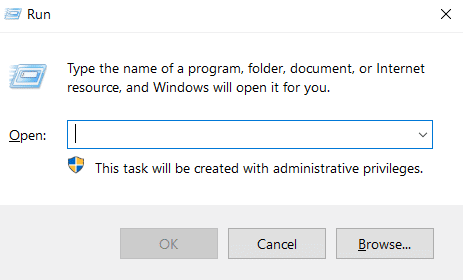
Step 2: Enter devmgmt.msc to open the device manager.
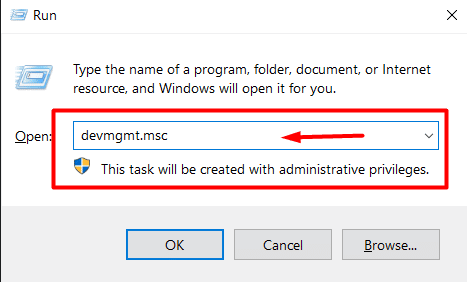
Step 3: Now locate your graphics card name under the “Display adapters” option.
Step 4: Right-click on the GPU and select the option “Uninstall device”.

3. Remove All Charges of Static Electricity
Having cleaned the software and drivers, the next step is to remove all the static electricity from the PC.
Generally, static electricity is the electric charge that remains on the surface of objects until they are grounded. Whenever you power the PC, some amount of power is stored. However, the small amount can easily zap your motherboard or GPU and make them non-workable.
To remove the static charges, you have to follow these steps
- Turn off the main power supply.
- Keep the power button pressed for 5 seconds.
- As a result, all the stored power will be discharged.
- Then unplug all the CPU connections.
4. Ready with an Anti Static Wrist Wrap
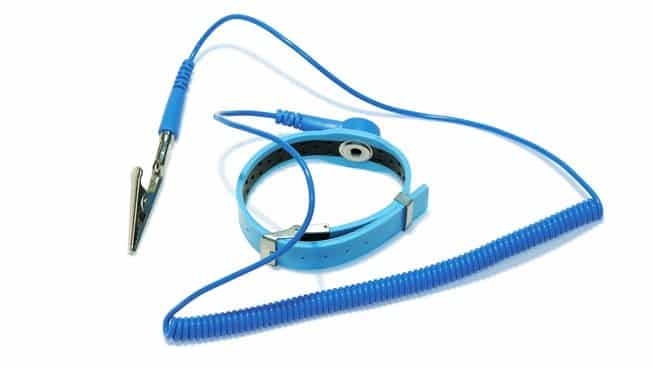
As previously mentioned, the GPU is highly sensitive to electric fields, so it is always beneficial to wear an Anti Static Wrist Strap.
Anti Static Wrist Strap is a handy tool for the removal of GPU. It is not only used in cases of GPUs but also all over where static electricity may damage products. The device is used to prevent static electricity from building up around electronic devices.
There are two ends to this watch-like strap, one for attaching to the hand and the other for connecting to the PC. It bypasses all the electric fields that can distract or cause issues with the performance of the GPU.
Learn more: Solve: This effect requires GPU acceleration on Premiere Pro
5. Open The Case
After removing all the static electricity and wearing an Anti Static Wrist Wrap, you are now ready to remove the graphics card.
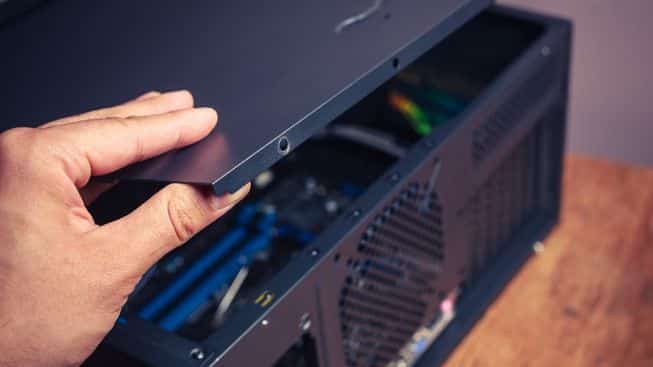
In order to remove the graphics card, you have to open the CPU cabinet. You shouldn’t have any trouble if you’ve opened the computer before, but if you haven’t, it may be more challenging.
In all CPU cabinets, two panels are present – one attached by a screw and one fixed to the equipment type. Identify the panel attached to the screw and remove it.
Furthermore, you may discover a lot of dust inside your cabinet when you open it. To clean any dust collected in the case’s base, use a lint-free cloth or compressed air.
6. Find the GPU
Once you clean all the dirt from the floor of the CPU, now your next target is to locate the GPU.
The majority of the graphics card comes with a six-pin or eight-pin PCI-E cable for power output. With this high-quality and large power cable, you can easily find the GPU.
Note:- PCI-E cables come in three types, depending on the GPU and its power requirements.
- 6-pin PCI-E cable that requires 75w
- 8-pin PCI-E cable that requires 150w
- 12-pin PCI-E cable that requires 600w
Anyone can locate the GPU in the lowermost area of the CPU, where the PCI-E slot is available, but the place of these PCI-E slots varies with brand.
7. Pull the Graphics Card Out
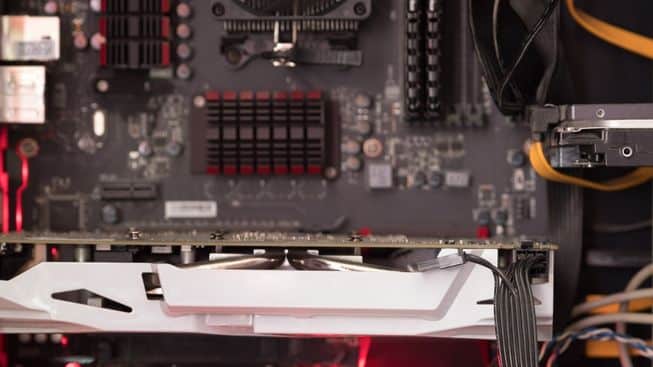
After removing all the cables and PCI Express cables. It’s time to remove the graphics card.
There is a hardware lock on the GPU that must be removed before doing so. However, locking patterns vary depending on the manufacturer and model.
Graphics cards are usually locked with a set of screws, so you need to unscrew them. Unscrewing the graphic card disconnects it from the panel by removing the screw on the lower side, but it remains connected to the motherboard. In order to remove the card, you must pull out the lever from the small tab where the card is located.
Here, you need to be extra careful and pull the card slowly. Don’t exert too much force while pulling the card out because it can damage the card.
8. Store in an Antistatic Bag
Once the GPU has been removed, storage becomes crucial. As a result of its reactive nature, a GPU can be easily damaged through static electricity. To prevent such damage, it is highly recommended to use an antistatic bag.
Besides GPUs, you can also store motherboards, HDDs, SDDs, and many other PC components. To prevent electrostatic damage, these bags are made from polyethylene, plastic, and terephthalate.
Antistatic bags are usually silver in color, but today they come in a variety of colors. You can buy them online or in offline stores.
Final Words
The answer to how to take out a graphics card is simple, but the process is not as simple as it seems. In case you are not aware of all these steps, you may easily damage your whole system, including your PC and GPU set.
Following these steps is the best way to remove a graphics card without causing damage. Using this method, you will avoid unexpected costs and damage to your GPU.
Before removing the part, you must check with the manufacturer if it still has a warranty. There is sometimes a risk of voiding any warranty attached to a component after it has been removed.