How to Clean Your GPU: A Step-by-Step Guide
Keeping your GPU clean is crucial for optimal performance, energy efficiency, and a prolonged lifespan.
However, many people overlook this important aspect of computer maintenance, resulting in various issues that could have been easily prevented.
In this blog post, we’ll walk you through the essentials of cleaning your GPU – from the reasons why it’s necessary to and how to do it properly step by step.
Equipped with these insights and tips, you’ll be able to breathe new life into your graphics card and enhance your overall computing experience.
Key Takeaways
- Cleaning your GPU is crucial for prolonging its lifespan, improving performance, increasing energy efficiency, and reducing noise.
- Essential tools for cleaning a GPU include compressed air, soft-bristled brush, microfiber cloth, and thermal paste (if needed).
- Properly replacing thermal paste can help reduce temperatures by several degrees Celsius leading to improved overall performance from your graphics card.
- Regular maintenance of your graphics card every 6 – 12 months ensures optimal functioning without any worries of reduced lifespan or poor functionality.
Why Is Cleaning Your GPU Important?
Cleaning your GPU prolongs its lifespan, improves performance, increases energy efficiency, and reduces noise.
1. Prolonged Lifespan
A prolonged lifespan for your GPU is one of the key benefits of regular cleaning. Dust, dirt, and debris that accumulate on the graphics card can cause it to overheat and eventually fail.
By meticulously removing these particles, you help maintain optimal temperatures within your system and keep internal components functioning properly.
For example, a gamer who diligently cleans their GPU every 6-12 months will experience better performance and longevity compared to someone who neglects this essential maintenance task.
Maintaining a clean computer case also plays a vital role in prolonging the lifespan of all its components such as the power supply unit and other operating systems.
2. Improved Performance
One of the significant benefits of cleaning your GPU is the noticeable improvement in performance. Over time, dust and other particles accumulate on the graphics card, causing it to overheat and even throttle its performance capabilities.
For example, gamers might notice an increase in frames per second (FPS) after a thorough GPU cleaning, leading to smoother gameplay experiences and less stuttering during high-intensity gaming sessions.
In addition to delivering improved visuals for gamers, better-performing GPUs can also accelerate tasks such as video editing and 3D rendering.
3. Energy Efficiency
Energy efficiency is a crucial aspect of any high-performing GPU, as it directly affects the overall performance and longevity of the system. Regular cleaning can enhance the energy efficiency of your graphics card by ensuring that all its components are functioning optimally.
For instance, clogged fans or heatsinks may hinder proper airflow, causing your GPU to overheat and consume more power to compensate for the increased heat generation.
By maintaining a clean GPU through periodic dust removal and inspection, you are reducing the workload on your cooling system, thereby improving its effectiveness in dissipating heat away from vital components.
A well-maintained graphics card operates at optimal temperatures with minimal energy consumption, promoting better gaming experiences without compromising the lifespan of your device while keeping those dreaded utility bills in check.
4. Reduced Noise
Cleaning your GPU regularly can also help reduce the noise level of your system. As dust and debris accumulate on the fans, they have to work harder to keep your GPU cool, which can result in an increased fan noise in the system.
In addition, maintaining proper airflow within your PC by cleaning out any obstructions and ensuring adequate cable management can further contribute to reducing noise levels.
This not only creates a more pleasant working environment but also helps prevent untimely wear and tear on hardware components.
Tools You Need For Cleaning A GPU
To effectively clean your GPU, you will need a few essential tools including compressed air, a soft brush, a microfiber cloth and thermal paste if needed.
Compressed Air
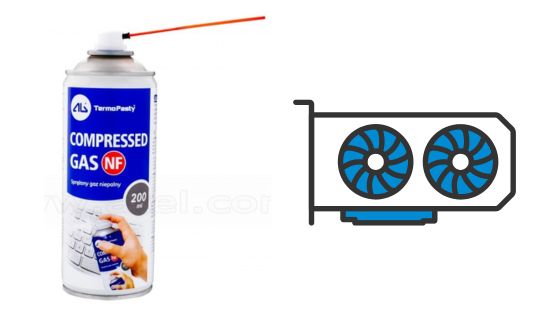
Compressed air is a crucial tool for cleaning your GPU. It provides a quick and effortless way to remove dust and debris from the fans and heatsinks without having to dismantle your GPU completely.
Compressed air cans come with long nozzles that enable you to aim it precisely at the areas that need cleaning, ensuring effective results. When using compressed air, ensure you hold the can upright and avoid shaking or tilting it too much to prevent any liquid from escaping.
Regularly using compressed air on your GPU fans and heatsinks will help maintain optimal cooling performance, reduce noise levels, avoid overheating issues thus prolonging its lifespan.
Soft Brush
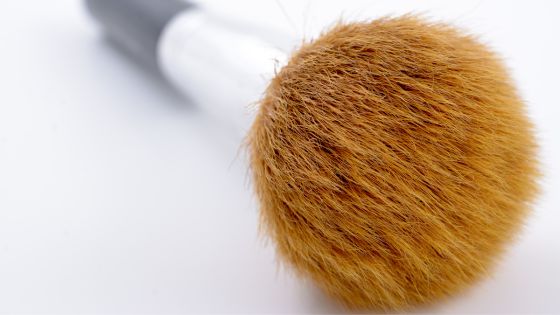
Using a soft-bristled brush is one of the necessary tools for cleaning a GPU. This tool is essential in removing dust and other debris that may have accumulated on the heatsinks and fans of your graphics card.
It is important to use a soft-bristled brush to avoid damaging any delicate parts or causing static electricity buildup before cleaning your GPU. A small, fine-tipped brush can also be used to reach tight spaces around the fan blades where dirt accumulates, ensuring optimal airflow through your system.
Regularly cleaning your graphics card using simple tools such as compressed air and a soft-bristled brush can improve its overall performance by preventing unwanted thermal throttling due to insufficient cooling caused by dirty fans and heatsinks as well as reduced noise levels in operation.
Microfiber Cloth
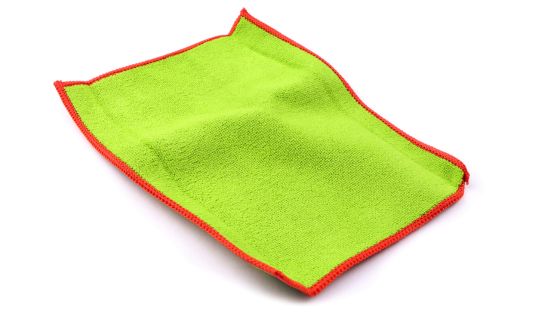
A microfiber cloth is an essential tool for cleaning your GPU. These cloths are incredibly soft and won’t scratch the surface of your graphics card, making them perfect for gently wiping away dust or other debris that may have accumulated on the card’s surface.
Unlike cotton rags or paper towels, microfiber cloths don’t produce lint or leave behind any fibers that could clog up the fans or heatsinks on your graphics card.
Using a microfiber cloth together with compressed air can help you tackle even tougher grime buildup on your GPU. First, blow any loose dirt away with compressed air before wiping down the surface of your GPU with the microfiber cloth.
Thermal Paste (if Needed)
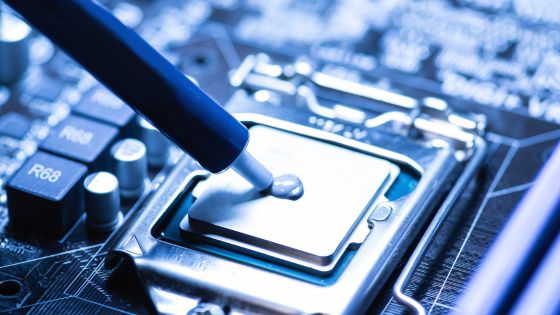
Thermal paste is a crucial element when it comes to maintaining your GPU’s cooling performance. Over time, this compound can become dry or damaged, causing the heat sink and GPU to work harder than necessary.
If you notice that your temperatures are higher than usual or if you plan on performing a thorough cleaning of your GPU, then it may be time to reapply thermal paste.
Properly replacing thermal paste can help reduce temperature by several degrees Celsius leading to improved overall performance from your graphics card. In addition, high-quality thermal paste ensures better conductivity between the heat sink and GPU which will keep them running smoothly for longer periods reducing wear on components.
How To Clean Your GPU: Step-by-Step Guide
After powering down and unplugging your system, remove the GPU from the motherboard (if desired), clean the GPU fans and heatsink with compressed air and a soft brush, reapply thermal paste if needed, then reassemble and reinstall the GPU.
1. Power Down And Unplug Your System
Before cleaning your GPU, it is crucial to power down and unplug your system. This ensures that there is no electrical current running through the components of your computer and prevents any potential damage or injury during the cleaning process.
Neglecting this step can result in irreversible harm to both you and your device. Besides, static electricity could cause immediate or long-term damage to hardware such as memory chips, fans, motherboards, graphics cards resulting in an expensive replacement.
2. Remove The GPU From The Motherboard (optional)
Removing the GPU from the motherboard is not always necessary, but it can make cleaning much easier. If you do choose to remove it, be sure to power down your PC and unplug it from the wall first.
This step may be useful if you notice that there’s an excessive amount of dust buildup around the graphics card area or if you plan on performing a deep cleaning. However, keep in mind that improperly handling or reinstalling your GPU can lead to damage or compatibility issues with other components.
3. Clean The GPU Fans And Heatsink With Compressed Air And A Soft Brush
To clean the GPU fans and heatsink, you’ll need a can of compressed air and a soft-bristled brush. Start by using the compressed air to blow away any loose dust or debris from the surface of the fan and heatsink.
Next, use the brush to gently remove any stubborn dirt or grime that won’t come off with just compressed air. Be careful not to apply too much pressure or scratch any delicate parts of your GPU.
Regularly cleaning your GPU fans and heatsink is important for maintaining performance, preventing overheating, reducing noise levels, and prolonging its lifespan.
4. Reapply Thermal Paste (if Needed)
Over time, thermal paste can dry out and lose its effectiveness. If your GPU is running hot or experiencing performance issues, it may be time to reapply the thermal paste.
Reapplying thermal paste can significantly improve cooling efficiency, leading to better GPU performance and stability. It’s important to follow the manufacturer’s instructions carefully when handling adhesive components to avoid damaging any parts of the GPU.
5. Reassemble And Reinstall The GPU
Once you have finished cleaning the fans and heatsink, it’s time to reassemble and reinstall your GPU. First, replace any thermal pads or paste that were previously removed during cleaning.
Gently place the cooler/fan assembly back onto the card, being careful not to damage any small components or connectors. Then use a Phillips #1 screwdriver to secure everything in place.
It’s important to note that reseating a graphics card can sometimes be tricky, especially if it hasn’t been removed before. Take extra care when sliding it back into its PCIe slot, aligning all of the pins with their corresponding holes before applying gentle pressure until you feel/hear a click indicating that it is securely attached.
How Often Should You Clean Your GPU?
Regular cleaning of your GPU is essential to maintain its performance, appearance, and longevity.
- Environmental factors: If you live in a dusty or humid environment, your GPU may require more frequent cleaning.
- Usage: If you use your computer for heavy tasks like gaming or graphic design, it may generate more dust buildup and require more frequent cleaning.
- Age: Older GPUs may accumulate dust faster than newer ones due to wear and tear on the cooling system components.
Generally speaking, it’s recommended that you clean your GPU at least once every six months. However, if any signs of dust accumulation or reduced performance appear before then, it’s better to clean the card sooner rather than later.
Regular monitoring of temperatures using tools like MSI Afterburner or GPU-Z can help identify when cleaning is necessary.
Additional Tips For Maintaining A Healthy GPU
Regularly monitoring your GPU’s temperatures, ensuring proper airflow and cable management, as well as keeping your PC in a clean environment are crucial for maintaining a healthy GPU.
Monitor Temperatures Regularly
One of the critical aspects of maintaining a healthy GPU is monitoring its temperature. Overheating can cause numerous issues, including reduced cooling efficiency and increased fan noise, among others.
Make sure to check your GPU’s temperature regularly, especially during intense gaming sessions or other CPU-intensive tasks.
If you notice that your GPU is running hotter than usual, it could be an indication of clogged fans or heatsinks causing poor airflow. Neglecting these signs can lead to thermal throttling, which causes reduced performance and system crashes.
Keep Your PC In A Clean Environment
Ensuring that your PC is in a clean environment can greatly impact the performance and lifespan of your GPU. Dust and debris not only clog up fans and heatsinks, but they can also block airflow, leading to increased temperature levels.
To maintain a healthy environment for your PC, make sure to keep it away from dusty areas such as garages or outdoor spaces with poor ventilation. Regularly dusting surfaces around the computer area and using an air purifier can also help reduce airborne particles in the environment.
Ensure Proper Airflow And Cable Management
Proper airflow and cable management are crucial to maintaining a healthy GPU. Without good ventilation, your graphics card can overheat and cause damage to its internal components.
This not only reduces performance but also shortens the lifespan of your GPU. By placing your PC in a well-ventilated area, you allow for proper air circulation around the components.
Cable management can be accomplished simply by using zip ties or Velcro straps to secure cables neatly along the edges of the case. Keeping things tidy will not only improve airflow, it also makes it easier to access and clean individual components when necessary.
Properly maintained GPUs with sufficient ventilation and organized cabling have been shown to increase performance while simultaneously lowering noise levels and power consumption.
Conclusion
Regularly cleaning your GPU is a necessary task for maintaining its performance, longevity, and energy efficiency. By using compressed air, soft brushes, microfiber cloths, and thermal paste (if needed), you can effectively remove dust and debris from the GPU fans and heatsink.
Don’t wait until your GPU starts to underperform or overheat before cleaning it! As a responsible gamer or computer user, schedule regular maintenance of your graphics card every 6-12 months.